

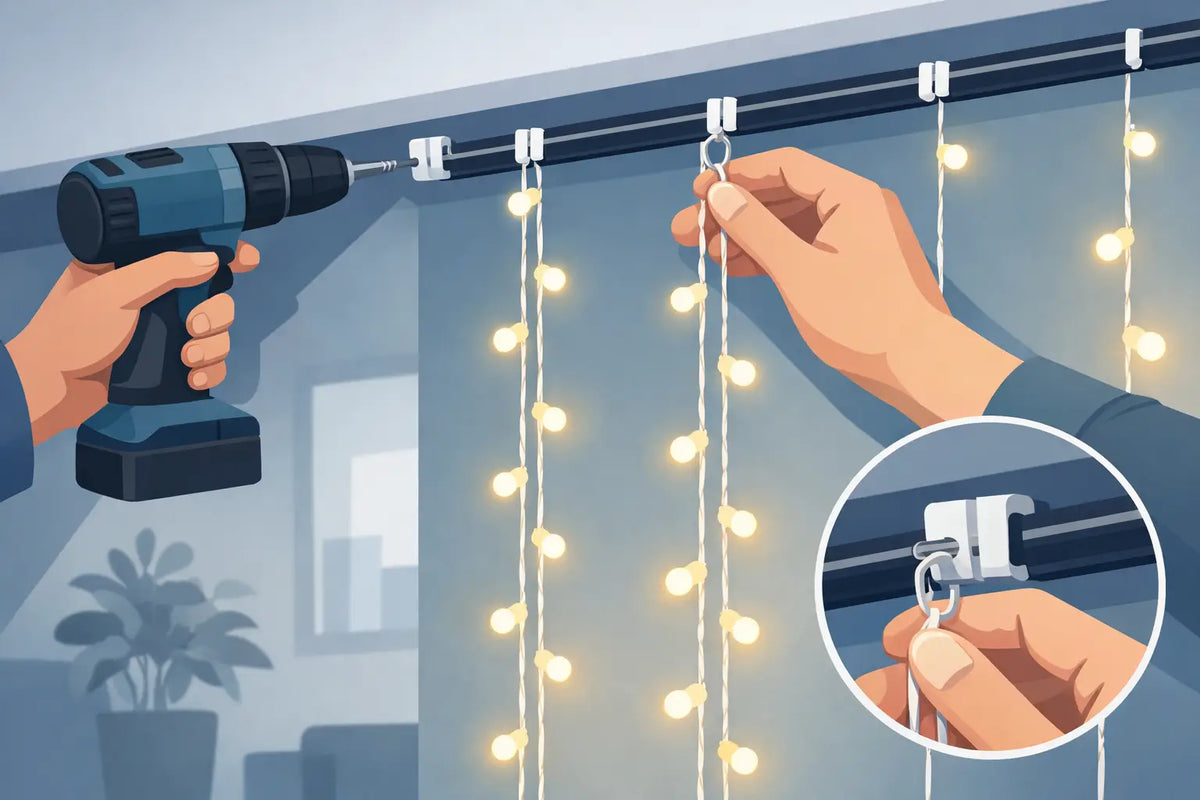
A light curtain only looks clean when every strand starts in the right place. Learning how to mount light curtain strands is less about forcing the lights onto a surface and more about creating a straight, supported top line that lets the strands hang evenly. A few careful measurements before you climb the ladder will prevent sagging, crooked patterns, loose adhesive pads, and the frustrating need to reinstall everything later.
For a Govee light curtain installation, treat the mounting system as part of the finished display. The lights need to sit flat enough for crisp animations, but the cable and individual strands also need room to hang naturally without tension.
Start With the Surface and Layout
Before opening a pack of clips or reaching for screws, inspect the area where the curtain will hang. Common locations include covered porches, patios, pergolas, exterior walls, windows, garage interiors, and screened outdoor living spaces. The best mounting approach depends on whether the surface is wood, vinyl, metal, masonry, or painted trim.
Measure the width of the curtain and the available mounting area. Do not assume the top cable will fit edge to edge just because the space appears wide enough. Leave room near the controller connection, power cable, and any corner where the cable needs to turn. If the curtain is wider than the intended area, crowding the strands together can distort the display and make the lower ends look uneven.
Mark the desired top line with a pencil, painter's tape, or a chalk line. On a wall, use a level. Along a porch beam or soffit, follow a straight architectural edge only if that edge is actually level. A top line that is off by even a small amount becomes much more obvious once multiple vertical strands are hanging beneath it.
Check for obstructions first
Look for downspouts, outlets, trim joints, doors, window hardware, security cameras, and places where people may brush against the strands. You also want to avoid placing the curtain where wind can repeatedly whip it into rough siding, sharp metal edges, or a railing.
For outdoor use, keep the controller and power connections positioned according to the lighting system's instructions. Plan the cable path before mounting the curtain. A polished installation does not have an extension cord pulled tight across a walkway or a controller hanging unsupported at the end of the display.
Choose Mounts That Match the Job
The stock adhesive options included with decorative lights can work on a clean, protected indoor surface. They are less dependable on textured siding, dusty wood, rough stucco, or exterior areas exposed to temperature swings and moisture. Adhesive also becomes a weak point when the cable is under tension.
For a long-term installation, use purpose-built mounts or clips that fit the light curtain cable securely without crushing it. A properly sized mount holds the cable in position while allowing for a clean, consistent run. PrintWorks 3D Light Curtain mounts are designed for this kind of product-specific fit, helping homeowners create a more permanent installation instead of relying on adhesive alone.
Screw-mounted clips are generally the strongest option for wood, painted trim, pergola beams, and other surfaces where a small fastener hole is acceptable. They handle weather and cable weight better than adhesive, especially when the curtain will stay up through multiple seasons.
Adhesive-backed mounts make sense when drilling is not an option, such as certain rental-friendly indoor setups or smooth metal surfaces. The trade-off is preparation and longevity. The mounting area must be thoroughly cleaned, dry, and warm enough for the adhesive to bond. Even then, inspect it regularly rather than assuming it will perform like a mechanical fastener.
Masonry requires compatible anchors and screws. Vinyl siding may need siding-specific hooks or a mounting plan that attaches to trim rather than puncturing the siding itself. If you are unsure what is behind a surface, do not drive a screw into it blindly.
How to Mount Light Curtain Strands Step by Step
Begin by laying the curtain flat on a clean surface and locating the main top cable, strand connection points, controller lead, and power lead. Untangle the strands completely before anything goes on the wall. Trying to separate tangled strands after the top cable is mounted usually twists the display and places unnecessary strain on the connections.
Mount the first clip or bracket at the controller end of the planned top line. This is your reference point. Secure the top cable in that first mount without pulling it tight. Then move to the opposite end, hold the cable along the marked line, and confirm that the curtain spans the area correctly before installing the final mount.
Once both ends are positioned, add intermediate mounts along the top cable. The ideal spacing depends on the cable's weight, the mounting surface, and exposure to wind. As a practical rule, support the cable often enough that it remains straight without visible dips between mounting points. More support is usually better than asking one or two clips to carry a long run.
Do not stretch the top cable like a clothesline. Leave a small amount of natural slack so changes in temperature, minor movement, and cable routing do not pull against the mounts or strand connections. The goal is controlled support, not maximum tension.
After the top cable is secured, gently separate and straighten each strand. Let them hang freely before attaching anything lower down. Turn the lights on and step back several feet. This is the best time to spot a strand that has crossed another, a section that is twisted, or an end that is hanging noticeably higher than the rest.
Secure lower sections only when needed
Many light curtain installations need support only across the top. The strands are designed to hang vertically, and fastening every strand can make the display look stiff or create stress points in high winds.
Lower retention is useful when the curtain is mounted outdoors in a breezy location, across a frequently used doorway, or against a surface where the strands cannot swing freely. In that case, use a light-touch approach. Add a small, compatible clip at the lower corners or at selected points where movement is most likely. Avoid pinching LED nodes, pulling individual strands tight, or fastening the wire at sharp angles.
If you are mounting the curtain around a window, leave enough clearance for the window to open and close. For a porch or pergola, keep strands away from gates, ceiling fans, grills, and areas where guests may catch them with chairs or equipment.
Keep the Pattern Straight and the Cables Protected
A mounted curtain can be secure and still look unfinished if the strands are uneven. After the first test run, make small adjustments at the top rather than tugging on the hanging sections. If a strand appears short, it may be looped around another strand or caught at the top cable. If the entire curtain leans, the top line is likely not level.
Keep controller and power cables supported rather than letting their weight hang from the curtain connection. Use appropriate cable clips along the route to the outlet, and avoid tight bends near plugs or controller ports. Any outdoor connection should be protected from direct standing water and placed where it will not be stepped on or snagged.
For installations exposed to rain, heat, snow, or strong sun, inspect the mounts after the first week and again after major weather. Look for loose screws, adhesive lift, cable rub points, or strands that have shifted. A quick check is much easier than repairing a curtain after a section comes down.
Common Mounting Mistakes to Avoid
The most common mistake is relying on adhesive pads over a dirty, textured, or weather-exposed surface. Another is placing too few top mounts, which allows the cable to sag and throws off every strand below it. Mounting while the strands are tangled also creates problems that are hard to see until the lights are powered on.
Avoid using staples, nails, or fasteners that can pierce or compress the wire. Do not overtighten mounts around the cable, and do not pull strands taut to make them appear straighter. Light curtains need enough freedom to hang naturally and enough support to stay where you put them.
A clean light curtain installation starts with a level top line, dependable mounting points, and a cable path that is protected from weather and everyday traffic. Take the extra time to mount it once with the right hardware, then let the lights do what they were meant to do: make the space look finished after dark.
Share:
Permanent Light Hardware That Holds Up Outside
Guide to Permanent Outdoor Light Mounting