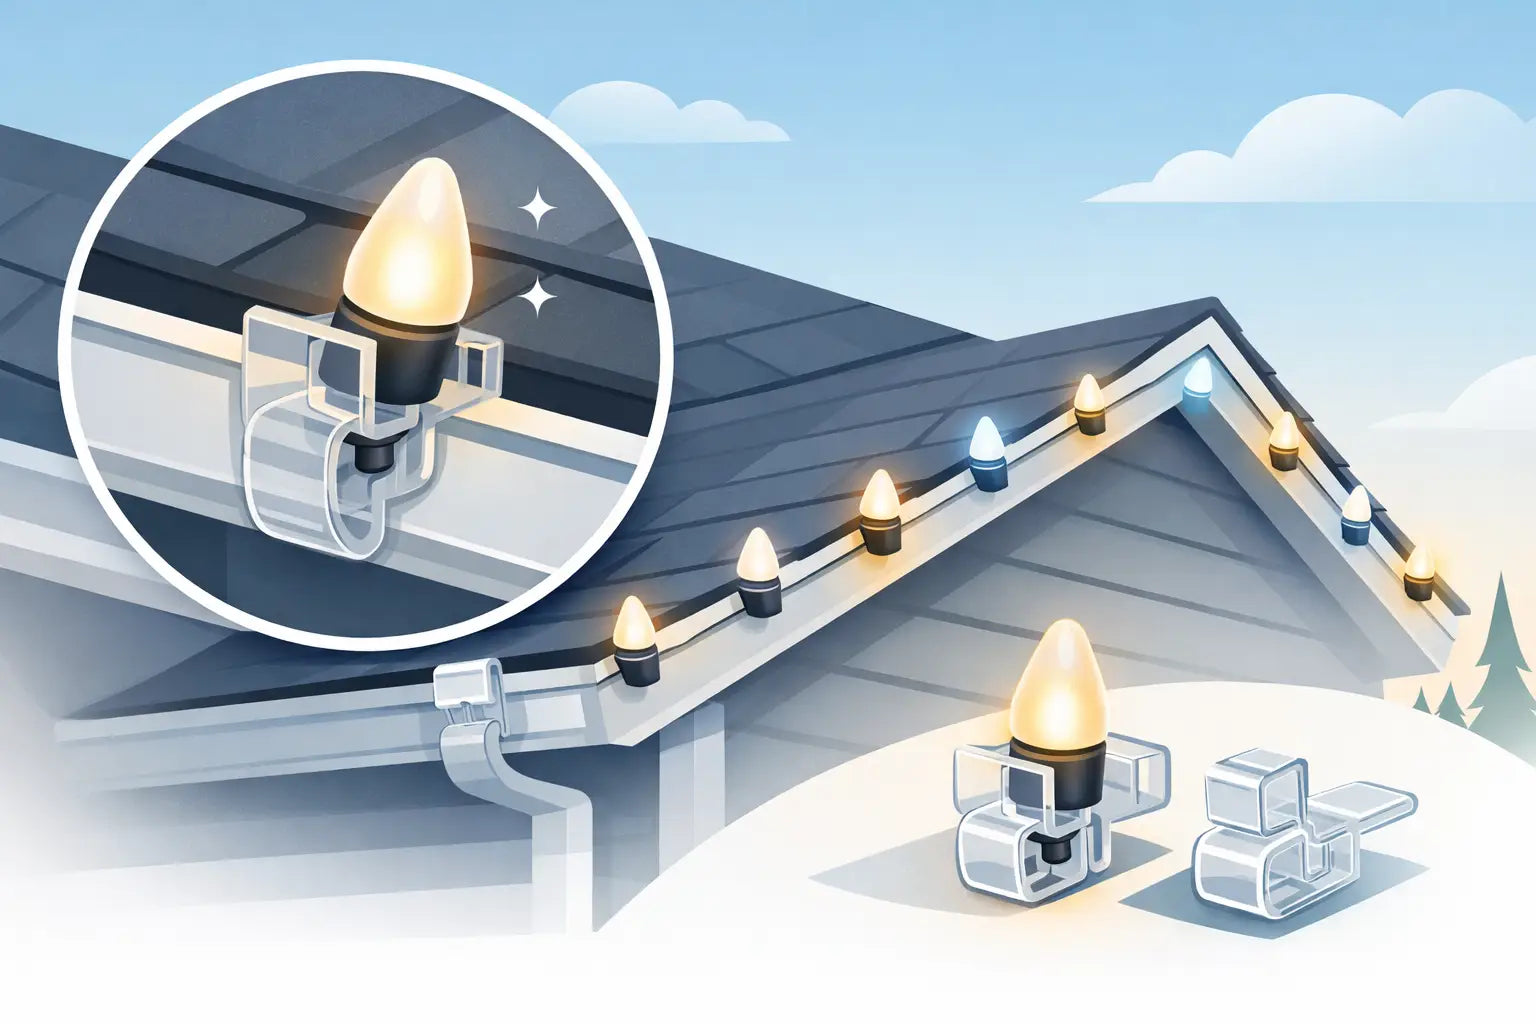
If your permanent outdoor lights looked great on day one but started sagging, twisting, or peeling away after a season, the problem usually is not the lights. It is the mount. Roofline LED light mounting brackets are the part that decides whether your install looks clean for years or turns into a ladder job every few months.
That matters more than most homeowners expect. Roofline lighting runs across fascia, soffits, peaks, gables, and trim that rarely give you a perfectly flat, forgiving surface. Stock clips and generic adhesives can work in ideal conditions, but outdoor rooflines are not ideal conditions. Heat, cold, moisture, wind, textured surfaces, and uneven angles all work against a clean install.
Why roofline LED light mounting brackets matter
A permanent lighting system is only as permanent as the hardware holding it in place. When brackets are designed around the shape of the light and the angle of the mounting surface, you get a tighter fit, more consistent spacing, and better aiming. That changes the final look of the lighting at night and the amount of maintenance you deal with later.
A good bracket does three jobs at once. It secures the light body, keeps the beam direction consistent, and helps the install line stay straight along the roofline. If one of those pieces is off, the whole setup starts to look uneven. You will notice hotspots, crooked light throw, or sections that pull away from the trim.
This is where purpose-built mounts earn their keep. A bracket made specifically for a matching light system removes guesswork. You are not trying to adapt a one-size-fits-all clip to a product it was never shaped for.
The real problems homeowners run into
Most people start with the hardware included in the box because that is the obvious move. Sometimes it works fine on a smooth section of soffit. Sometimes it becomes frustrating fast.
Adhesive-backed options can lose grip when surfaces are dusty, textured, damp, or exposed to major temperature swings. Generic clips may not sit flush on the trim you actually have. Even when they hold at first, they may allow slight shifting over time, and slight shifting is exactly what makes a permanent install look sloppy.
Rooflines also change from one section of the house to the next. The eaves may be simple, but peaks and gables often introduce steeper angles and tighter visual requirements. A bracket that works on a straight run may not give you the same clean result at a transition point. That is why many installs need more than one mounting style if the goal is a polished, built-in appearance.
What to look for in roofline LED light mounting brackets
Fit should come first. If the bracket is engineered around the exact light model, installation gets easier and the finished result usually looks better. The light seats properly, alignment stays consistent, and you spend less time compensating for hardware that does not quite match.
Material matters just as much. Outdoor mounts need to handle sun exposure, rain, cold snaps, and summer heat without getting brittle or deforming. A bracket can look solid in your hand and still fail outside if the material is not chosen for real weather exposure. For permanent installations, weather-resistant durability is not a nice extra. It is the whole point.
Installation design is another difference-maker. Homeowners want a mount that reduces time on the ladder, not one that turns every light into a mini fabrication project. Brackets that are easy to position, easy to fasten, and easy to use consistently across long runs save time and lower the chance of mistakes.
Then there is appearance. The right bracket should help the lights look intentional. Clean spacing and steady beam direction create that finished architectural effect people want from roofline lighting. If the hardware fights that goal, it is the wrong hardware.
Different roofline areas need different bracket behavior
Straight eave runs are usually the simplest part of an install, but they still need stable alignment. A bracket for this area should keep the light position uniform and resist gradual sagging. Small inconsistencies become obvious when you step back and view the full line across the front of the house.
Peaks and gables are less forgiving. The angle changes the way the light projects, so bracket geometry matters more here. A mount that helps maintain the intended direction of the beam can keep those upper architectural lines looking crisp instead of patchy.
Corners and transitions are where many DIY installs start to look improvised. Even if the lights themselves are high quality, poor support at a transition point can interrupt the visual flow. This is one of the biggest reasons homeowners move beyond stock hardware and look for purpose-built mounting accessories.
Why product-specific brackets usually outperform universal options
Universal mounts sound convenient, and sometimes convenience is enough for a temporary setup. For permanent outdoor lighting, universal usually means compromise. The light may fit loosely. The angle may be close but not quite right. The mount may work across multiple products, but not especially well with yours.
Product-specific roofline LED light mounting brackets are built around the actual dimensions and installation needs of the lighting system. That tighter relationship between bracket and fixture improves stability and appearance at the same time. It also makes the installation process more predictable, which matters when you are working across long runs or up near the roof peak.
For homeowners using Govee permanent outdoor lights, that specificity becomes even more valuable. Mounting accessories designed for those exact products help solve the fit and retention problems that generic hardware often leaves behind. That is the gap specialized brands like PrintWorks 3D are built to address.
Better brackets save more than time
There is a practical cost to bad mounting hardware. If lights shift, detach, or need repeated adjustment, you are back on the ladder. That is time, effort, and frustration you thought you had already spent. In some cases, movement can also affect wiring strain or leave sections looking obviously misaligned from the street.
Better brackets reduce that cycle. They help the original install stay put, which protects both the look of the system and the time you invested putting it up. For many homeowners, that peace of mind is worth more than the small savings of sticking with whatever came in the box.
There is also the value of confidence. When a mount is designed for ease of installation and built for weather resistance, you are not guessing how it will behave after the first storm or the first hard freeze. You can install once and expect it to stay that way.
The trade-off: cost now or maintenance later
There is a reason some people hesitate before buying upgraded brackets. Factory hardware is already included, and custom mounts add cost to the project. That part is fair.
But the real comparison is not included versus extra. It is basic hardware now versus fewer corrections later. If your roofline is simple, protected, and smooth, standard clips may do the job. If your home has long visible runs, tricky peaks, uneven trim, or weather exposure that pushes materials hard, better brackets are often the cheaper decision over time.
It depends on how permanent you want permanent to be. If you want a clean install that still looks right after seasons of heat, wind, and rain, the bracket should be treated as core hardware, not an afterthought.
Choosing the right bracket for your install
Start with the exact lighting model and the surfaces where it will be mounted. Then think about the layout of the home. Straight soffit runs, front-facing peaks, gables, and architectural accents may not all need the same bracket style.
From there, focus on three outcomes: secure hold, consistent angle, and a clean finished line. If a bracket helps all three, it is doing its job. If it only attaches the light but does nothing for alignment or presentation, you may still end up dissatisfied with the result.
Customer feedback can also be useful here, especially for products used in real outdoor conditions over time. Homeowners who have already installed permanent lighting on similar rooflines can reveal whether a bracket simply fits or truly performs.
The best roofline LED light mounting brackets are not flashy. They solve fit problems, improve durability, and make the installation look like it belongs on the house. That is exactly what mounting hardware should do. When the lights stay aligned, the trim line stays clean, and you are not dragging out the ladder again next season, the difference is easy to see.
Share:
How to Install Outdoor LED Lights on Soffit
Govee Pro Mount Installation Guide