

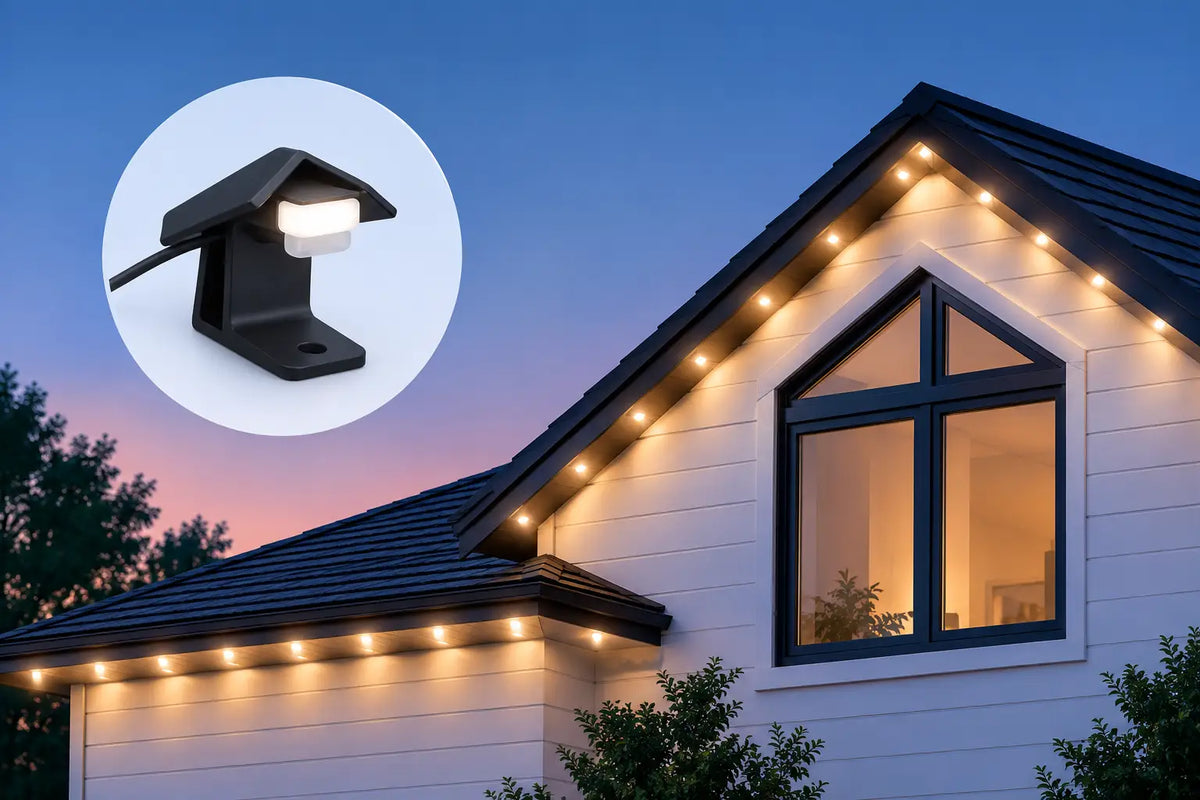
A roof peak is where a permanent lighting install either looks intentional or starts to look improvised. Govee peak mounts give the light run a secure, consistent transition at a gable or roofline peak, helping each puck stay pointed where it belongs instead of relying on tape, loose wire, or a clip that was never designed for the angle.
For homeowners installing Govee permanent outdoor lights, this small piece of mounting hardware can make a visible difference. The right mount helps preserve even spacing, keeps the wire path controlled, and creates the finished appearance expected from a lighting system meant to stay up season after season.
Why Roof Peaks Need a Purpose-Built Mount
Straight soffit runs are relatively simple. A peak is different. Two rooflines meet, the direction changes, and the lighting run has to make that transition without putting stress on the cable or leaving a light puck at an awkward angle.
Factory adhesive can work on a clean, flat surface under ideal conditions. But exterior surfaces experience heat, cold, moisture, dust, and movement. At a roof peak, where access is limited and a failed attachment may require another trip up the ladder, relying on adhesive alone can be a frustrating gamble.
A purpose-built peak mount gives the installation a fixed mounting point at the change in direction. Rather than forcing the cable to dictate the placement, the mount helps establish a clean path first. That means less visual wandering, less strain at the transition, and a more deliberate look from the street.
This is especially useful on prominent front-facing gables. A single crooked puck or drooping wire may not stand out from the ladder, but it will be easy to spot once the lights are on at night.
What Govee Peak Mounts Actually Solve
Peak mounts are not just cosmetic accessories. They address several real installation problems at once: alignment at the apex, cable management around the turn, and reliable retention where standard mounting approaches can fall short.
The biggest benefit is consistency. Permanent outdoor lights look best when every puck follows the same setback and orientation. At a peak, generic clips can leave you guessing where the next light should land. A mount designed for that location gives you a repeatable reference point and a cleaner transition from one roof slope to the other.
They also support the long-term goal of a permanent installation. Exterior hardware should be selected with weather exposure in mind, not treated as an afterthought once the lighting kit is already open. A well-fitted mount reduces dependence on adhesive, helps prevent cable sag, and keeps the run from looking unfinished as conditions change through the year.
There is a practical safety benefit, too. Planning the peak mount before installation can reduce the number of adjustments you make while working at height. Fewer retries on a ladder usually means a faster, calmer install.
Choose the Mount for Your Light Series and Surface
Not every Govee light system uses the same puck shape, cable layout, or mounting geometry. Before ordering peak hardware, confirm which permanent outdoor light series you own and make sure the mount is intended for that model. A close fit is not the same as a correct fit, particularly when the mount will carry an exterior light through changing temperatures.
Your mounting surface matters just as much. Common locations include wood fascia, soffit boards, trim, and other finished exterior materials. Look closely at the condition of the surface before choosing a fastening approach. Solid, sound material gives screws the holding strength needed for a lasting installation. Soft, cracked, rotted, or thin trim may need repair or a different mounting plan first.
Color is worth considering as well. A mount that blends with white trim, dark fascia, or the lighting system itself can help the hardware disappear during the day. The goal is not to make every component invisible at close range. The goal is a clean roofline that does not pull attention away from the lighting effect.
PrintWorks 3D designs product-specific mounting accessories for Govee systems because fit is where a permanent installation is won or lost. A mount should hold the intended component securely without forcing it, pinching the wire, or requiring a workaround that creates more problems later.
Plan the Peak Before You Mount the First Light
The peak should be part of the layout plan, not an obstacle discovered halfway through the job. Start by standing back from the home and identifying the exact visual center of the gable. Then consider the intended spacing on both slopes. Depending on the length of each run and the spacing available in your kit, the peak may receive a light puck, serve as the transition point between two pucks, or require a slightly adjusted layout to keep the overall pattern balanced.
Do a dry fit before drilling. Hold the mount in position, route enough cable to understand how it will approach and leave the peak, and verify that the nearby pucks will remain evenly spaced. This is the moment to find clearance issues with trim, gutters, siding, or architectural details.
Avoid pulling the cable tight across the apex. The wire needs a controlled route with enough natural slack to avoid tension, but not so much that it droops below the line of the installation. A properly planned peak makes both sides of the gable look like one continuous system.
Check the viewing angle at ground level
A layout can look straight while you are standing directly under it and look uneven from the driveway. Step back several times during the dry fit. Check the peak from the front of the home and from the primary approach path. If the gable is a key feature, a few extra minutes of alignment work is well spent.
A Better Installation Process for Roofline Peaks
Start with a clean, dry mounting surface. Brush away dirt and debris, and make sure the material is ready to accept the fasteners recommended for the mount and surface. If you are working on painted wood, take care not to overtighten fasteners, which can crack paint or damage the trim.
Position the peak mount based on your dry-fit layout, then fasten it securely. Install the compatible Govee light or cable section as intended by the mount design. Before continuing down either roof slope, confirm that the light face is oriented correctly and that the cable exits without a sharp bend or pinch point.
From there, work outward from the peak. This is often easier than installing one full slope and trying to force the final section into place at the top. As you add each light, maintain your planned setback from the edge of the fascia or soffit. Consistent placement matters more than rushing to use every inch of cable.
Once the full run is mounted, power on the system before putting tools away. Check that every light operates, inspect the peak after dark, and look for shadows or misalignment that were not obvious in daylight. Small adjustments are much easier before the ladder is stored and the project feels finished.
Common Peak Installation Mistakes to Avoid
The most common mistake is treating the peak as an afterthought. When spacing is planned only from one end of the roofline, the final lights often bunch up near the gable or leave an awkward gap at the apex. Starting with the peak layout prevents that problem.
Another issue is mixing mounting methods without a plan. Adhesive, generic clips, and purpose-built mounts may all have a place in an installation, but each should be used where it makes sense. A highly visible directional transition deserves hardware designed to hold its position.
Do not mount over a cable that is already under tension. Tension can pull a component out of alignment and adds unnecessary stress to the wire over time. Likewise, do not assume a mount can correct a damaged or unstable fascia board. Secure hardware needs a secure surface behind it.
Finally, remember that permanent outdoor lighting should remain serviceable. Keep controller access, extensions, and connection points in mind while planning the roofline. A polished install is not only straight and secure. It is also practical to inspect or service if needed.
Make the Peak Look Like It Belongs There
The best roofline lighting installations have a simple quality: they look like they were planned with the home, not added to it later. A properly selected peak mount helps create that result by giving one of the most visible parts of the run the support and alignment it needs.
Take the time to match the mount to your Govee light series, inspect the mounting surface, and dry-fit the gable before fastening anything. When the peak is clean, centered, and secure, the rest of the roofline has a much better chance of looking just as permanent as the lights were meant to be.
Share:
Govee Roofline Retrofit Example That Looks Clean