If you have ever been halfway up a ladder trying to make a Govee light sit straight under an eave, you already know the stock hardware is not always the clean answer. The best Govee eave mounting options are the ones that match your exact light model, your trim shape, and the kind of finish you want when the lights are off just as much as when they are on.
That is where most installs either start looking permanent or start looking patched together. A good mount does more than hold a light in place. It controls spacing, keeps the beam angle consistent, helps resist weather and heat, and cuts down on the small install mistakes that become obvious from the street.
What makes the best Govee eave mounting options
For most homeowners, the right mount comes down to four things: fit, durability, appearance, and install speed. If one of those is missing, the job gets harder fast.
Fit matters because Govee product lines are not all shaped the same. A mount that works for one puck or module may not seat properly on another. That can leave lights tilted, loose, or under strain. If you are installing permanent outdoor lighting, you want the mount designed around the actual housing, not something generic that almost works.
Durability is next. Eaves and soffits deal with heat, cold, rain, UV exposure, and seasonal expansion in the trim. Adhesive-only setups can be tempting because they are fast, but they often become the weak point over time. A purpose-built mount made for exterior use gives you a much better chance of keeping the layout straight through changing weather.
Appearance is usually what pushes homeowners to upgrade. A crooked line of lights under the roofline is hard to ignore. The best mounting option keeps spacing even and orientation consistent, especially on long front elevations where every little variation stands out.
Install speed matters too, especially if you are working off a ladder or trying to finish before weather moves in. A mount that positions each light quickly and repeatably is not just convenient. It helps you stay accurate when fatigue sets in.
Best Govee eave mounting options by install type
The best choice depends on where the lights are going and how permanent you want the installation to be.
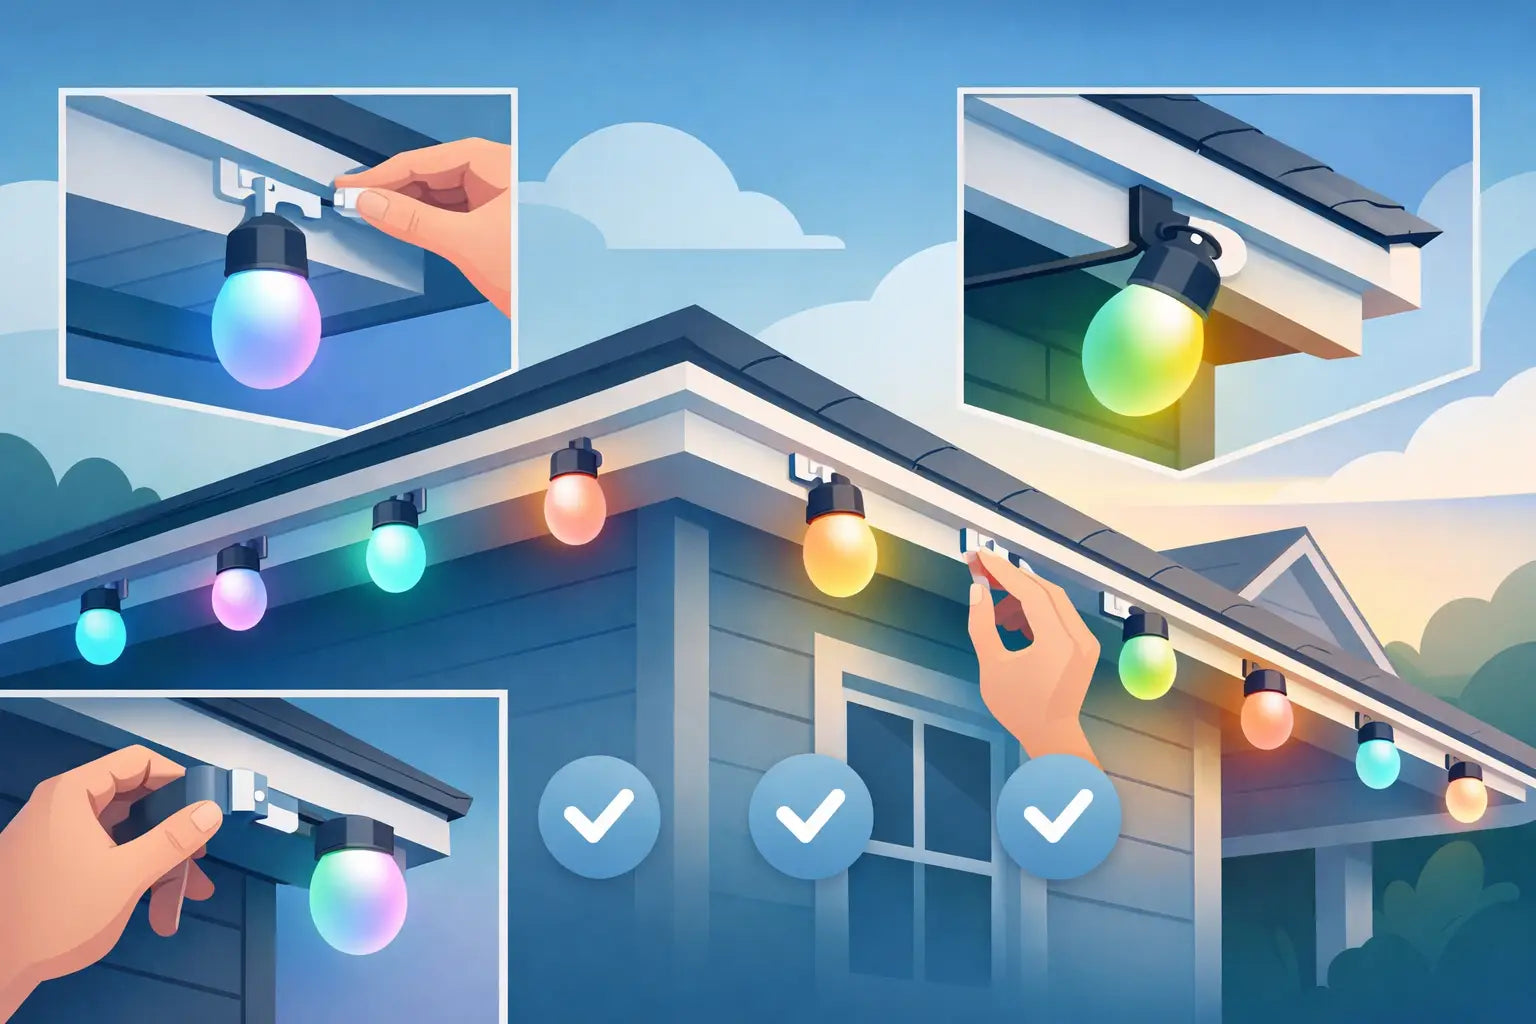
Flush eave and soffit mounts
For standard horizontal soffits, flush mounts are usually the cleanest option. These hold the light snug to the mounting surface and help keep each fixture pointed in a consistent direction. If your goal is a low-profile look that blends into the eave during the day, this is often the strongest option.
Flush-style mounts also make spacing easier to control. Instead of relying on adhesive pads or freehand placement, you get a defined seat for each light. That reduces the chance of drifting lines across a long run.
The trade-off is that flush mounts work best when the soffit is fairly even. If the surface has vents, seams, heavy texture, or irregular trim details, you may need a mount with more flexibility or a slightly different geometry.
Fascia-facing mounts
Some homes do not have an ideal soffit layout for standard under-eave placement. In those cases, fascia-facing mounts can make more sense. These are useful when you need to place lights along a board edge or adjust the light orientation based on roofline design.
This option can produce a sharp result, but it is more sensitive to visibility in daylight. If the mount and light body sit more exposed, alignment becomes even more important. A purpose-designed mount helps keep that line intentional instead of improvised.
Angled mounts for peaks and gables
Straight rooflines are the easy part. Peaks, gables, and angled eaves are where many installs start to lose consistency. The best Govee eave mounting options for these sections are angled mounts designed to maintain light direction and visual spacing while following the architecture.
Without an angled solution, DIY installers often start compensating by twisting the light, adjusting adhesive position, or forcing a fit. That usually shows up at night as uneven wash patterns or odd brightness differences from one section to the next.
If your home has multiple roofline changes, using dedicated angled mounts where needed is usually worth it. It keeps the install looking intentional from end to end.
Retrofit-friendly mounts
Not every homeowner is starting from scratch. If you already installed Govee lights with clips, adhesive, or factory hardware and are not happy with the result, retrofit-friendly mounts can save the job without making you start over completely.
These are especially helpful when lights are sagging, rotating, or sitting unevenly after a season outside. A retrofit approach gives you a cleaner final result without wasting the lighting system you already bought.
Why generic clips usually fall short
Generic mounting clips sound practical until you start working through a full roofline. They may hold for a while, but they rarely solve the details that matter on a permanent install.
The first problem is inconsistent fit. If the clip does not match the shape of the light housing, it may pinch in the wrong place or fail to keep the light centered. The second problem is repeatability. On a short test section, that may not seem like a big deal. Across 50 or 100 feet, small inconsistencies become obvious.
Then there is weather. Outdoor installs need material strength and stable geometry. When a clip flexes too much, softens in heat, or shifts under load, the visual line suffers. A mount engineered specifically for the light model and use case tends to hold alignment better over time.
Matching the mount to your Govee setup
Before you buy any mounting hardware, confirm your exact Govee system. Pro and Non-Pro lights need different fitment, and specialty products like curtain lights or prism-style layouts bring their own mounting requirements.
That is the step people skip when they are in a hurry. They search for a mount, see that it mentions Govee, and assume it will work across the whole product family. That shortcut can cost you install time and a lot of frustration on the ladder.
You also want to think about the surface itself. Vinyl soffit, aluminum trim, painted wood, and composite exterior materials all behave a little differently. Some surfaces are smoother, some flex more, and some expose the hardware more clearly in daylight. The best mount is not just compatible with the light. It should also make sense for where it is going.
Installation details that matter more than people expect
Even the best mount cannot fix a rushed layout. Start by checking spacing before final attachment. Measure enough to establish a repeatable pattern, then verify the look from the ground. A line that seems straight from six feet away can read differently from the curb.
Pay attention to corners and transitions too. Those are the spots where a polished install separates itself from a quick one. If your home changes pitch or steps through multiple architectural features, use mounts that maintain the same visual rhythm instead of improvising section by section.
Cable management matters as much as fixture placement. Loose wire between lights can make a clean mount look unfinished. Plan your routing before you lock everything in, especially near peaks, power locations, and controller placements.
And be honest about access. If a section is difficult to reach safely, a mount that installs faster and with less repositioning is not just a convenience. It is a better choice.
When a purpose-built mount is worth it
If you only care about getting the lights up for one season, you may be able to get by with simpler hardware. But if you want a true permanent outdoor lighting setup, purpose-built mounts usually pay for themselves in appearance, install speed, and fewer headaches later.
That is especially true for homeowners who notice details. If you care about clean lines, secure attachment, and a finished look that holds up through heat, cold, and storms, the mount is not a small accessory. It is part of the system.
PrintWorks 3D focuses on that exact problem - giving Govee owners mounts designed around real-world installations, not one-size-fits-all guesses. That kind of fit matters when you are trying to make the lights look like they were meant to be there all along.
The best choice is the one that matches your specific Govee model, your trim layout, and your tolerance for rework. Get those three things right, and the install gets easier, the line gets cleaner, and your lights start looking permanent for all the right reasons.
Share:
Are 3D Printed Outdoor Mounts Durable?
Retrofit Mounts for Outdoor LED Lights